
User Guides For Jira Timesheet
Add Timesheet Report Gadget to a Dashboard in the Dashboards section
Timesheet Report App supplies you with a gadget named Timesheet Report Gadget to add to a Dashboard when editing one.
1. Open a dashboard
2. Click on ![]() button
button
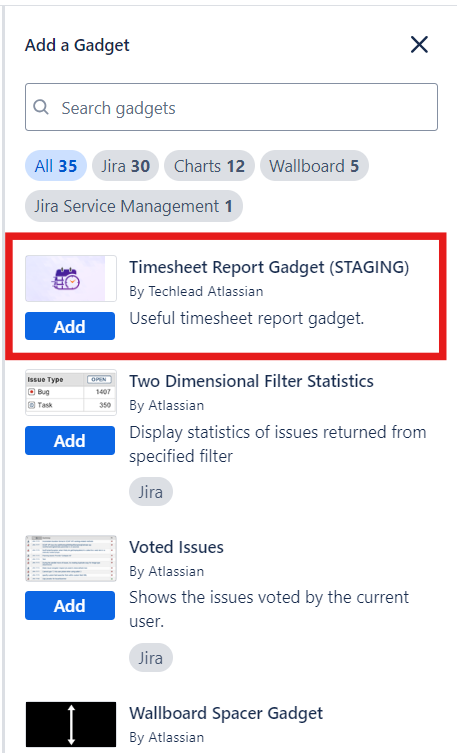
3. Type “Timesheet Report Gadget” in the search box of the Add Gadget panel to find the gadget quickly
4. Click “Add” to add it to the current Dashboard.
Configure and View Timesheet Report Gadget in the Dashboards section
1. Configure Timesheet Report Gadget
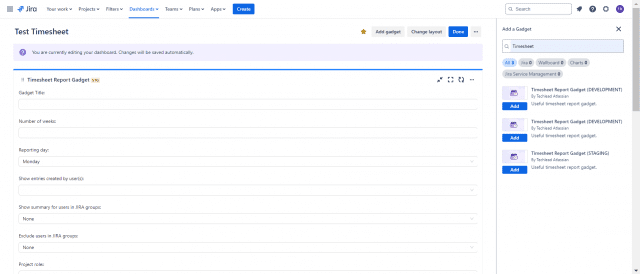
After adding a Timesheet Report Gadget to a dashboard, you have to configure it to show worklogs on the gadget.
|
Field Name |
Description |
|
|---|---|---|
| 1 |
Gadget Title |
Type thetext for the title of the report |
| 2 |
Number of weeks |
Type the number of weeks that you want to display in the report |
| 3 |
Reporting day |
Select the beginning day of a week |
| 4 |
Show entries created by user(s) |
Select users that you want to display their worklogs in the report |
| 5 |
Show summary for users in Jira groups |
Select groups that you want to display their members’ worklogs in the report |
| 6 |
Exclude users in JIRA groups |
Select groups that you don’t want to display their members’ worklogs in the report |
| 7 |
Project role |
Select project roles in the selected projects that you want to display their worklogs in the report |
| 8 |
Show summary for filter |
Select filters of issues that you want to display their worklog data in the report |
| 9 |
Comment First Word(s) |
Type the text to filter the work descriptions that you want to display their worklog data in the report |
| 10 |
Show Weekends |
Select to show weekends in the report or not |
| 11 |
Show Details |
Select to show details of issues (Issue Summary) or not |
| 12 |
Month View |
Select to view reports on month(s) or not |
| 13 |
Sum by |
Select to sum worklog data by day/week/month |
| 14 |
Sum SubTasks |
Select to sum worklog data by subtasks or their parent issues |
| 15 |
Project |
Select projects that you want to display their issues and worklogs in the report |
| 16 |
Assignee |
Select assignees that you want to display their issues and worklogs in the report |
Save Configuration: Click “Save” to save the configuration and show the timesheet report.
Cancel Configuration: Click “Cancel” to cancel the configuration and discard changes.
2. View Timesheet Report Gadget
After saving the configuration, you can view the Timesheet Report


There are some buttons to quickly configure the report:
1. Previous: Come to the previous timeframe
2. Start Date: Show the Start date of the current timeframe
3. Next: Come to the next timeframe
4. Week: View by Week
5. Month: View by Month
6. Calendar: Sum by Day/Week
Configure and View Timesheet Report in the Project section
Configure Timesheet Report in the Project section
1. In the Project navigation bar, Apps section, click on Timesheet Report App.

2. Click on “Configuration”

3. Start to Configure Timesheet Report

|
Field Name |
Description |
|
|---|---|---|
| 1 |
Gadget Title |
Type thetext for the title of the report |
| 2 |
Number of weeks |
Type the number of weeks that you want to display in the report |
| 3 |
Reporting day |
Select the beginning day of a week |
| 4 |
Show entries created by user(s) |
Select users that you want to display their worklogs in the report |
| 5 |
Show summary for users in Jira groups |
Select groups that you want to display their members’ worklogs in the report |
| 6 |
Exclude users in JIRA groups |
Select groups that you don’t want to display their members’ worklogs in the report |
| 7 |
Project role |
Select project roles in the selected projects that you want to display their worklogs in the report |
| 8 |
Show summary for filter |
Select filters of issues that you want to display their worklog data in the report |
| 9 |
Comment First Word(s) |
Type the text to filter the work descriptions that you want to display their worklog data in the report |
| 10 |
Show Weekends |
Select to show weekends in the report or not |
| 11 |
Show Details |
Select to show details of issues (Issue Summary) or not |
| 12 |
Month View |
Select to view reports on month(s) or not |
| 13 |
Sum by |
Select to sum worklog data by day/week/month |
| 14 |
Sum SubTasks |
Select to sum worklog data by subtasks or their parent issues |
| 15 |
Project |
Select projects that you want to display their issues and worklogs in the report |
| 16 |
Assignee |
Select assignees that you want to display their issues and worklogs in the report |
Save Configuration: Click “Save” to save the configuration and show the timesheet report.
Cancel Configuration: Click “Cancel” to cancel the configuration and discard change
View Timesheet Report Gadget
After saving the configuration, you can view the Timesheet Report
There are some buttons to quickly configure the report:
1. Previous: Come to the previous timeframe
2. Start Date: Show the Start date of the current timeframe
3. Next: Come to the next timeframe
4. Week: View by Week
5. Month: View by Month
6. Calendar: Sum by Day/Week